How do you implement user groups, roles and permissions in a multitenant environment where you have multiple organizations using the same application and each have own users and groups and roles? There are different approaches to the issue and one is to implement Attributes-based access control (ABAC) in addition with roles (RBAC). But what does that actually mean?
In short: you’ve groups, groups have roles and roles have permission attributes. Well, read forward and I’ll explain how to tie things together using CASL: an isomorphic authorization JavaScript library which restricts what resources a given client is allowed to access.
Authorization mechanisms
First let’s start with short introduction to authorization: “Authorization is the process of determining which action a user can perform in the system.” Authorization mechanism grants proper privileges for a user defined by some role or other factor. Two popular types of authorization are: Role-based access control (RBAC) and Attributes-based access control (ABAC)
Role based access control (RBAC) is a simple and efficient solution to manage user permissions in an organization. We have to create roles for each user group and assign permissions for certain operations to each role. This is commonly used practice with roles suchs as “System admin”, “Administrator”, “Editor” and “User”. The drawbacks of RBAC, especially in a complex system, is that a user can have various roles, which require more time and effort to organize. Also the more roles you create, the more security holes will be born.
Attributes-based access control (ABAC) is an authorization mechanism granting access dynamically based on user characteristics, environment context, action types, and more. Here we can have some action which is permitted to certain user, e.g. "{ action: 'edit', subject: 'Registration' }", "{ action: 'manage', subject: 'User', fields: ['givenName', 'familyName', 'email', 'phone', 'role'] }". For example, a manager can view only the users in their department; an user can not access his project’s information. ABAC is sometimes referred to as claims-based access control (CBAC) or policy-based access control (PBAC). You often see ABAC authorization mechanism in cloud computing services such as AWS and Azure.
The difference between ABAC and RBAC is that ABAC supports Boolean logic, if the user meets this condition he is allowed to do that action. Attribute-based Access Control (ABAC) enables more flexible control of access permissions as you can grant, adjust or revoke permissions instantly.
RBAC is a simple but sufficient solution to manage access in an uncomplicated system. However, it is not flexible and scalable and that is why ABAC becomes an efficient approach in this case. In the contrast, ABAC may be costly to implement. There is no all-in-one solution and it depends on your business requirements. Remember that use the right tool for the right job.
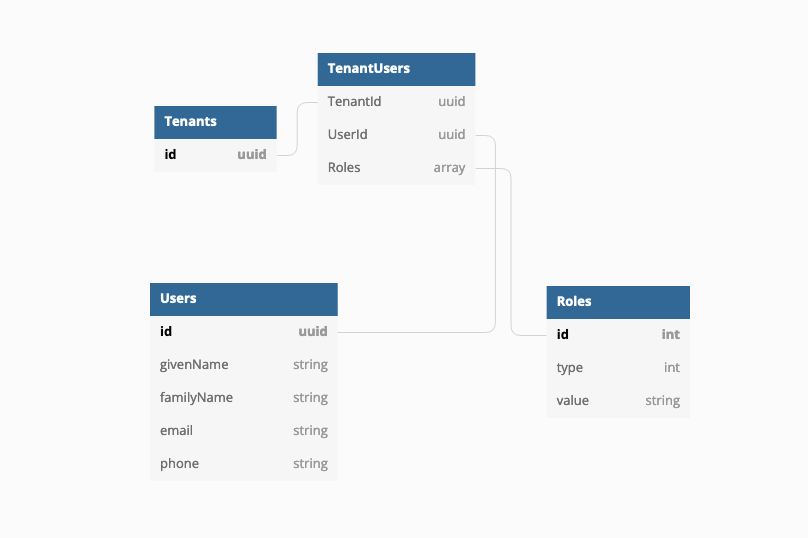
RBAC table structure can be visualized with:
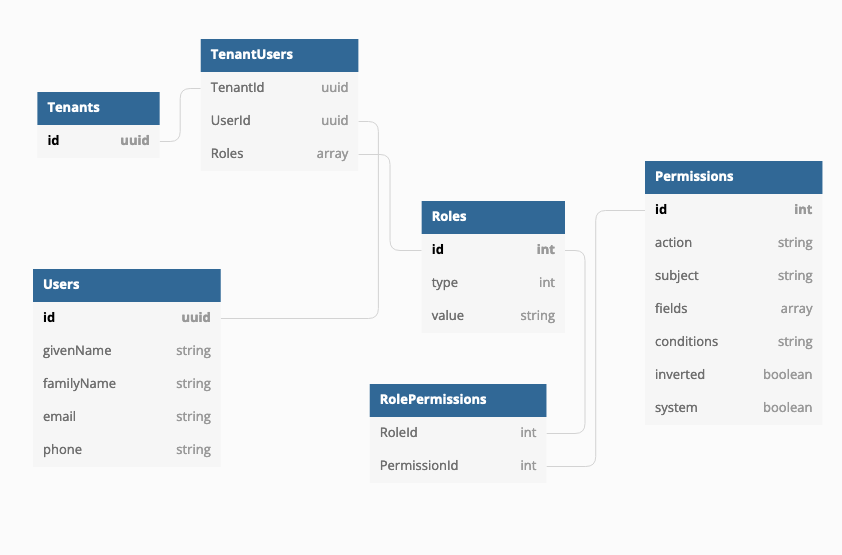
And you can add attribute based permissions to RBAC model:
Using CASL with roles and permissions
CASL is a robust authorization library for JavaScript and including RBAC it also supports ABAC implementation by adding condition expression to the permission. That’s exactly what we need in this case where we have a requirement to define different permissions for custom groups: need for roles and groups.
CASL has good resources and shows a great cookbook how to implement roles with persisted permissions. To supplement that you can check Nest.js and CASL example which also shows table structures in different stages.
The code for the following part can be seen in Gist
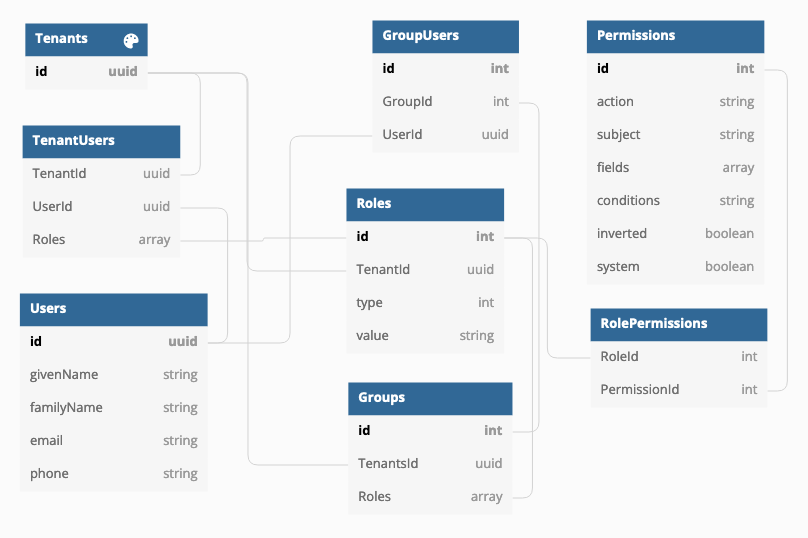
Table structure
- Global Users table
- Users are grouped by tenant in TenantUsers
- TenantUsers have a role or roles
- Users can be added to a group
- Groups and roles are tenant specific
- Permissions can be added to a role
Table structure in DBDiagram syntax
Next we create the table structure to our code with help of Sequelize ORM which describes the models, relations and associations.
We have the following models for our table structure:
models/rolepermissions.jsmodels/role.jsmodels/permission.jsmodels/group.jsmodels/groupuser.js
The Sequelize modeled class looks like this:
You can see all the models on the Gist.
Defining CASL permissions to user
In this example we are adding permissions directly to the JWT we are generating and signing so we don’t have to fetch user’s permissions every time from the database (or cache) when user makes a request. We get the claims.role from the authentication token and it can be e.g. “admin”, “user” or whatever you need.
services/token.js is the class where we fetch the permissions for the role and generate the JWT. It fetches the permissions for the user’s roles, gets the user groups and those groups’ roles and permissions. Then it merges the permissions to be unique and adds them to the JWT.
The JWT looks something like this:
Now we have all the permissions for the user in JWT which we can use in our services and routes. The solution isn’t optimal as the JWT can grow large if user has lots of permissions.
In the JWT you can see that the conditions attribute has a placeholder. middleware/abilities.js class parses the user JWT which we added permissions in JSON format, converts the condition to CASL’s condition and creates a CASL Ability so that we can add permission checks later on to our actions.
Now you can check the permissions in e.g. route.
const ForbiddenOperationError = {
  from: (abilities) => ({
    throwUnlessCan: (...args) => {
      if (!abilities.can(...args)) {
        throw Forbidden();
      }
    },
  }),
};

...
try {
    const abilities = defineAbilitiesFor(jwtToken);
    ForbiddenOperationError.from(abilities).throwUnlessCan('read', 'Users');
    const users = await UserService.getAll(user.tenant);
    return res.send({ entities: users });
} catch (e) {
    return next(e);
}
...
Summary
Implementing authorization is an important part of software system and you’ve several approaches to solve it. RBAC is a simple but sufficient solution to manage access in an uncomplicated system. ABAC in the other hand is flexible and scalable approach but may be costly to implement. There is no all-in-one solution and it depends on your business requirements.
Using CASL with roles, groups and permissions makes the handling of the authorization side of things easier but as you can see from the database diagram the overal complexity of the system is still quite high and we’re not even touched the user interface of managing the roles, groups and permissions.
Leave a Reply